Russian Banya / Finnish Sauna
.
Research into the construction of a Russian banya (or Finnish sauna) - a necessity for any home. Construction began 2 December 2024 and was completed about 2 months later.
Model
Banya/sauna plans.
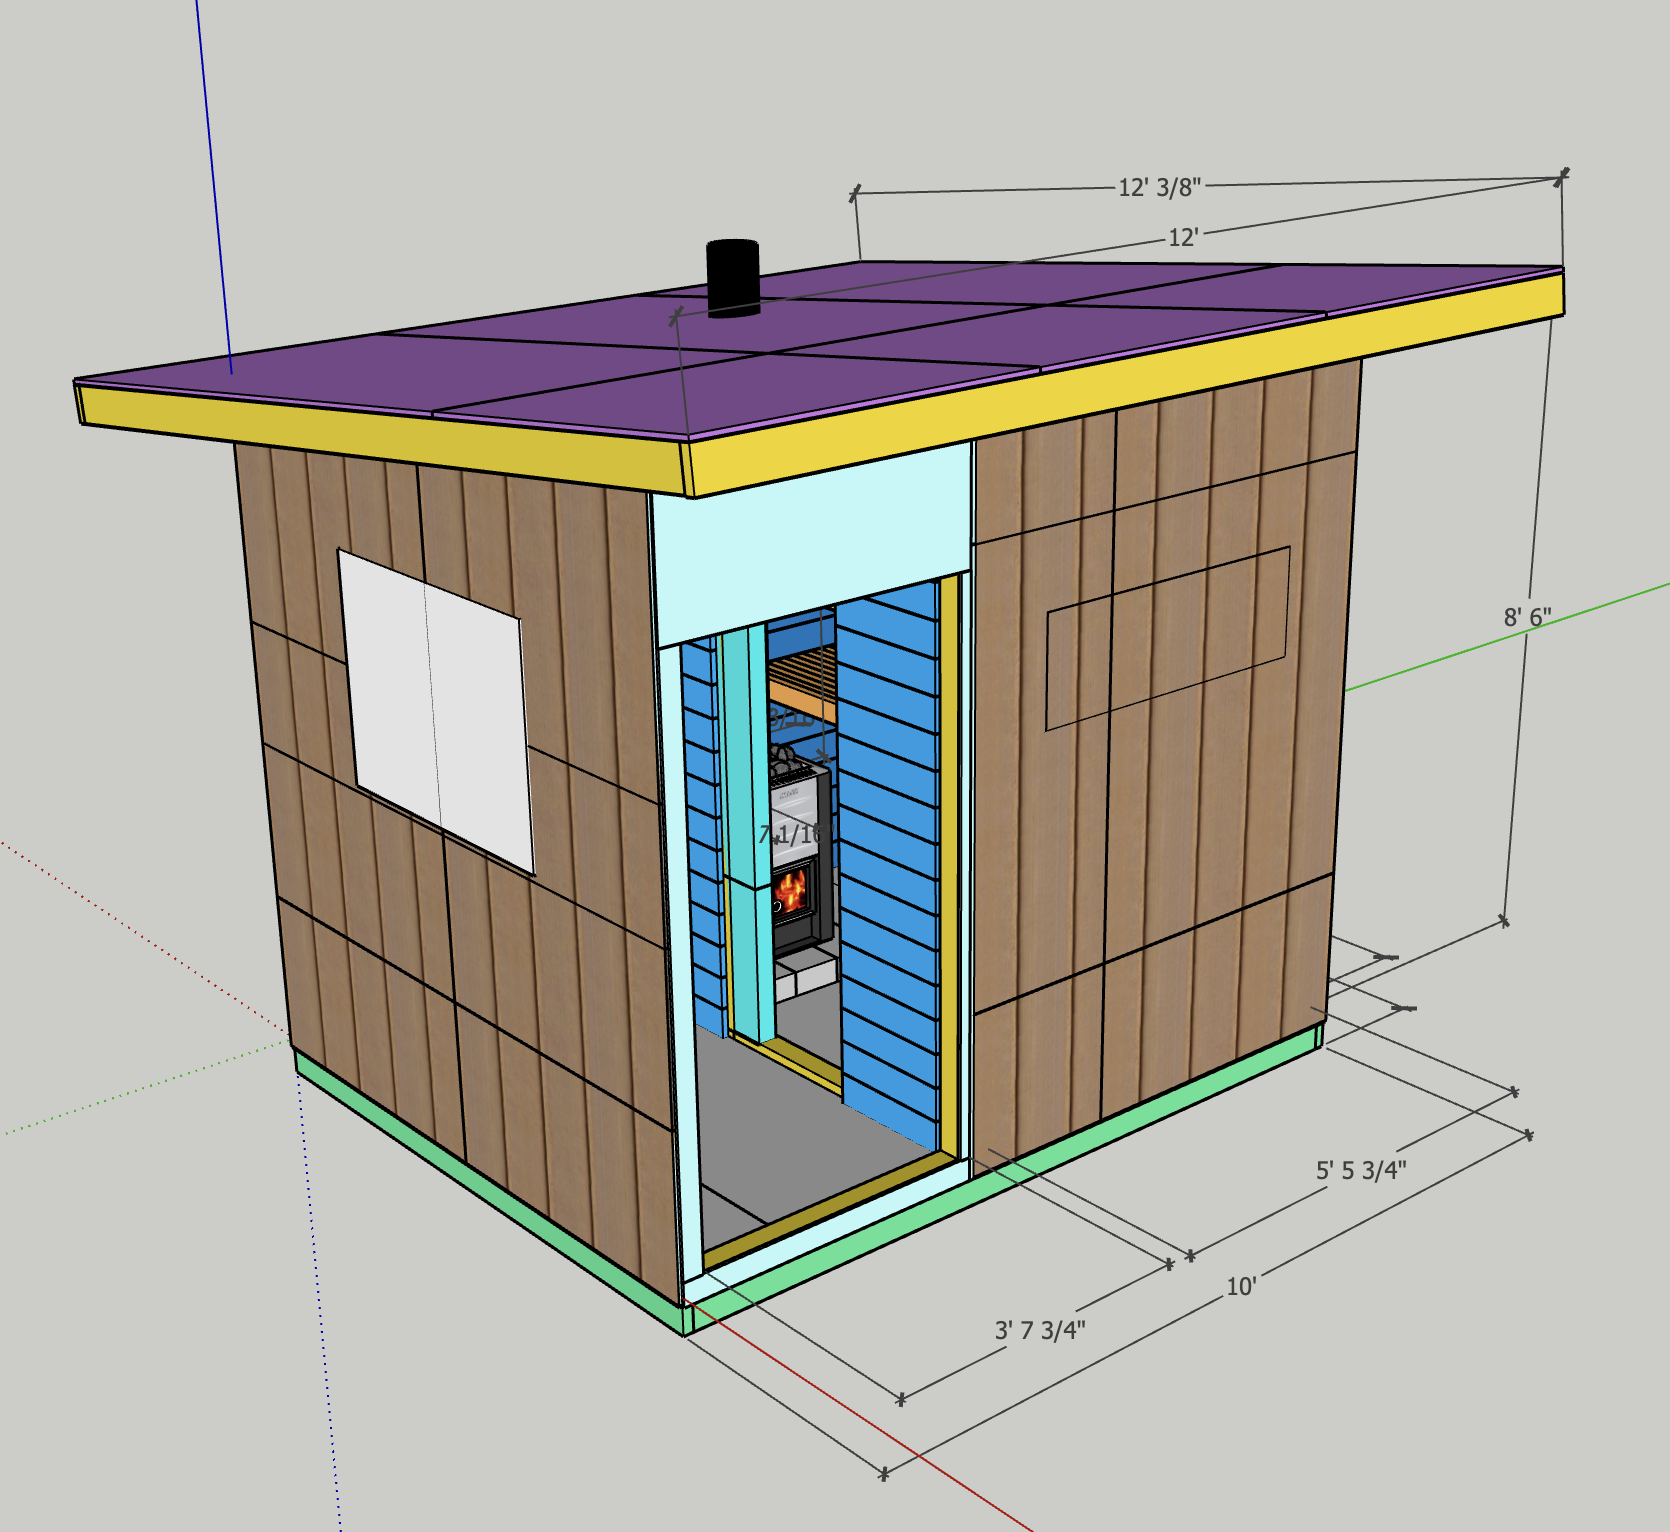

Dimensions
Most American sources advise to build a sauna/banya no taller than 7’, otherwise, they say, lower areas will not retain heat as it rises. Apparently, this is utterly wrong. Finns and other sauna enthusaists say to build no less than 8 1/2’ tall for proper hot air circulation and comfort when raising arms.
My sauna/banya’s hot room dimensions are approximately 8 1/2’ tall with 5 1/2’ x 7 1/2’ floor space. The changing room (or predbannik) floor space is 3 1/2’ x 7 1/2’.
Occupancy
Some recommendations I’ve found for occupancy, which seem correct to me:
- 8’x10’ fits 7-10 people
- 5’x7’ and 6’x7’ popular for home, fits 3-5 people
Foundation
There are two basic types of above-ground structural foundations:
- pier involves vertical posts upon which the foundation rests.
- skid involves laying a foundation directly on the ground
- in either case, make sure string outline is square by measuring diagonally from corners
I ended up using a pier foundation, with treated 4x4 posts inserted into Camo deck blocks (strong plastic alternatives to concrete blocks), with each block sitting on a 4” hole filled with gravel. In retrospect, I should have created a large perfectly flat gravel bed under the entire structure plus a bit extra. But I was doing this in winter when the ground was frozen and very difficult to dig up. A large flat gravel bed would have been simpler.
Floor
2x6 treated lumber for floor joists. I used 3/4’ oriented strand board (OSB) for subfloor, although plywood would generally be recommended for more moisture resistance. On top of the OSB, I’ve added a layer of tar paper. On top of the tar paper, I sloped the floor towards a central drain cutout using the Ben Square Method. Above the sloped strips is cement board, with large slate tiles on top.
Drain
Given that a proper sauna/banya is a wet environment, a floor drain is necessary. Anyone who says otherwise is wrong.
Floor insulation
There are various views on whether floor insulation is necessary. I did not use any in order not to make it any easier for opportunistic mice to find a cozy home. I have not noticed any problems with heating the room, although the floor is certainly cold in winter long after the heat around the benches has become hot. Duckboard on the floors would provide something warmer to step on, but so far I have not found a colder floor to be a problem.
Duckboard
While I have not done so, some banya/sauna builders place “duckboard” panels on the floor for added comfort. These are removable sections of 1”x3” or 1”x4” wooden slats with 1/2” spacing between the slats. Water drains between the gaps and does not pool up on the boards.
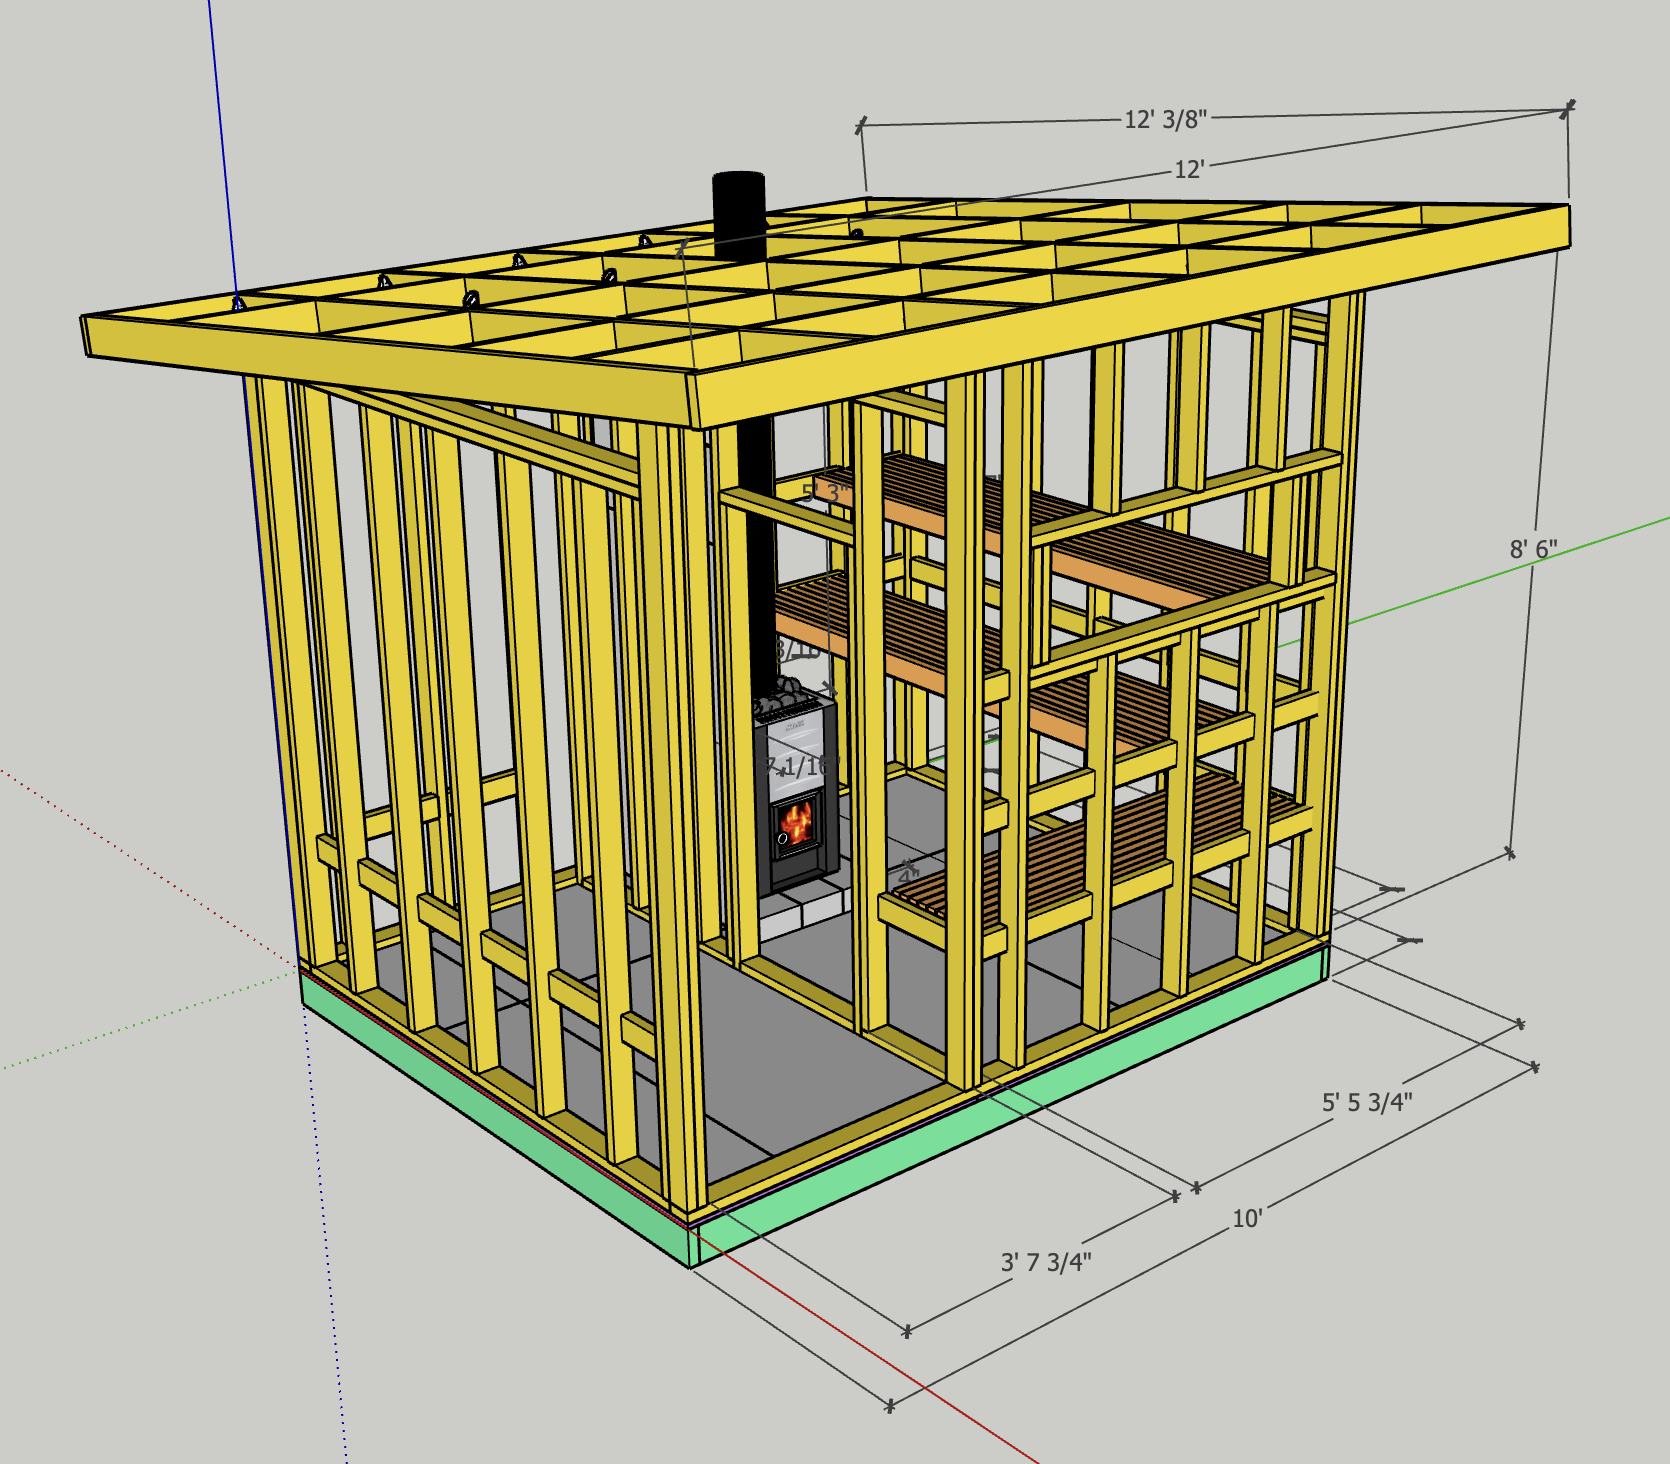
Framing
Standard stick framing.
Walls
Studs and plates:
- 2x4’ studs (vertical pieces), spaced 16” on-center…
- … except the first and last stud in the wall, which should be 15 1/4” from their nearest neighbor
- 2x4’ headers and bottom plates (horizontal pieces)
Ensure your spacing of studs works for whatever sheathing material you are using
- a common practice is to place load-bearing wall studs 16” apart and non-load-bearing studs 24” apart
- start by marking the bottom and top plates every 16” (except first and last marks, which are 15.25” from ends)
- note that the so-called 2”x4” is actually 1 1/2” by 3 1/2” due to the difference in nominal vs. actual dimensions used in the lumber industry.
- add horizontal supports between studs at height where benches can be screwed in
- secure all frame joints with two 3 1/2” nails
Roof
- run roof rafters longer than needed
- cut “birds mouth” slots into rafters where they sit on top of wall top plates
- bolt rafters to walls with hurricane ties
- stove pipe thimble can insulate and space the stovepipe where it goes through the roof
Windows
Insulated tempered glass is preferable, although many use whatever regular glass is available. Any window will reduce the heat retention. As long as the stove is strong enough, this is not a problem.
I have a fixed insulated tempered window in the hot room, a small regular piece of glass removed from an old door used as a window separating the hot room from the predbannik, and a cheap vinyl big box store tilting basement window with a bug screen high up in the predbannik wall to the outside.
Door
Opens outwards
- standard = 24” x 72”
- rough opening = 26” x 75” (1/2” more on each side than actual door size for wiggle room)
- headings are 1” wider than door on both sides, plus another 3” extra total
- handle made of wood
- non-metallic door catch available from sauna dealers
- leave air space below door of 5/8” to 1” for oxygen
Vents
- intake vent below heater near floor
- exhaust vent towards the ceiling on other side of room
- perhaps a second exhaust under the benches
- 3”x10” duct space
Insulation
Some notes I’ve collected about insulating and waterproofing of a stick frame construction banya/sauna..
Line the interior with high-temp aluminum foil vapor barrier with shiny side in (Type C single-side foil)
- start from bottom of wall and work up so higher sheets overlap lower ones
- aluminum duct tape to cover seams and tears`
Suggested insulation values between studs/joists:
- R13 for walls
- R22 or R26 for ceiling
- can put two layers of R13 laid in perpendicular orientation to achieve higher R-value.
- consider recycled cotton insulation or mineral wool, rather than fiberglass, because it’s easy to work with and non-toxic
- floor doesn’t need insulation, although some do it
- caulk bottom of walls meeting floor for waterproofing and to allow a little movement
I ended up using Rockwool “Safe ‘n’ Sound” for the walls and “ComfortBatt” R23 for the ceiling. Rockwool is called a “mineral wool” or “stone wool” material, made of spun molten mineral, stone, or ceramic material. The interior is lined with foil vapor barrier and seams are taped with aluminum tape.
Interior
Wood paneling
Deciduous trees
- western red cedar, aspen, spruce, hemlock, pine?
- western red cedar is very popular in North America, but is unheard of in Finland or Russia
- western red cedar and other heavily aromatic woods may cause irritation and allergic reactions for some people
- some varieties may leak melting sap which can hurt
- use pieces with less sap or knots on benches, walls, and ceiling near where people will sit
- tongue and groove boards of 1”x4” or 1”x5” nominal widths
- with the grooves facing down so water can’t collect into them
- galvanized 1.5” nails
- 5D galvanized small head siding nails
- place furring strips (small 1-2” strips of wood) between the foil vapor barrier and the interior wood paneling to allow air circulation and water evaporation.
After struggling with the decision, I used very generic cheap readily-available 1x6 tongue & groove pine boards for the walls and ceiling paneling, using the best quality pieces for the benches, walls, and ceiling where people will sit, and knottier and lesser quality pieces in other less important areas. I am very happy with the result. In retrospect, the pining by many (pun intended) for cedar and other photogenic woods seems like a distraction for a sauna/banya enthusiast who just wants a good schvitz.
Heater
- drum stoves are popular because doesn’t require welding, although their efficiency is questionable.
- preferable to feed wood from predbannik, although slightly more complicated to run stove through wall
- volcanic rocks placed on top of heater to retain heat… rocks need to be replaced periodically
- wire mesh or some other containment device to hold rocks in place… professional stoves generally come with this
I bought a Harvia Pro 20 sauna stove, which can heat a larger space than I need. I also bought the matching Harvia chimney and Harvia chimney extension, going with the same brand since this was my first time assembling a stove and I was concerned about ill-fitting parts. A matching protective sheath allows me to place the stove safely vey close to the walls, since my space is very limited, while still remaining within code. Harvia is considered a Finnish budget brand, but my setup seems to work well.
Stoves are expensive, consuming perhaps half of the total materials cost. But they may be the most important investment. In retrospect, all my earlier concern over the correct insulation and paneling wood has melted away… just get a nice big strong stove, make sure you provide good ventilation, and you will be happy.
Remember that you are trying to avoid a sauna experience that resembles what you find in a typical gym or hotel in North America. You need a lot of heat, good air circulation, and proper placement of benches. That’s it.
Benches
- use thick 2”x2” or 2”x3” or 2”x4” planks
- avoid knots in wood since these heat up more and burn your sensitive parts.
- fastened w/ screws on underside
- at least two-tiers
- L-shape? Some like, some don’t.
- long enough for you to stretch out comfortably
- generally allow two feet of bench for each person on the upper bench
- 1/2” gap between planks
- lower bench should be 18” from floor and 17” deep for strength
- upper bench should be 18” higher than lower bench, about 3 1/2
- 4 ft from ceiling and 20” to 35” wide for comfort
I built L-shaped benches from the same 1x6 pine wood I used for paneling, cut into 2 inch strips spaced about 1/2 inch apart. Despite the wood being slightly thinner than recommended, I provide sufficient support bars under the strips so that there is no sagging.
The paneling wood works very well, although the foot bench becomes dirty and stained easily. I may apply a food-grade “mineral oil” treatment to the foot bench to try to make it more impervious to dirt/staining. My bench tops are removable for periodic cleaning/sanding, but the bench frames are fixed.
Lighting
Most pundits agree that lighting should be discrete and dim.
- ~60W light bulb, weatherproof and heat proof encasement if placed high up.
- Finnish tradition would be a candle window between the predbannik and the banya
In the predbannik, I retrofitted a Danish Poulsen-style PH5 pendant lamp with a solar-powered LED bulb. In the hot room, I placed the solar-powered LED bulb hanging under the bottom bench for ambient light. A glass window showing the fire in the wood burning stove mixed with dim solar-powered lighting creates a great ambience in the hot room and does not require electrical connections to the outside, except simple plastic conduits hidden under the paneling that connect the small solar panels attached to the outside to the bulbs inside.
Water
Access to water is necessary. As this banya/sauna is outdoors without a river or lake near enough to jump into quickly, I considered but decided not to connect it permanently to a water supply with plumbing. Instead, I have a long drinking-water-safe hose that connects the house hose attachment to a spigot on the outside of the banya/sauna. This spigot allows water to flow through a short pipe into the hot room, where a second spigot connects to a short interior hose that can be used to splash water around, fill buckets, etc.
While the long hose can be a bit messy to deal with, this method works… except in deep winter when the water in the hose freeses. Fortunately/unfortunately, deep winter is rare in New York. But in those times, I simply bring filled buckets into the banya/sauna from the house. This method works, but one day I may install more permanent plumbing.
A friend loaned me a portable cold plunge, which sits outside. This is a great addition!
References
- Trumpkin’s notes on sauna building: https://localmile.org/trumpkins-notes-on-building-a-sauna/ (I wish I had found this earlier)
- http://homesaunakits-since1974.com/Sauna-Building-Aids/106-sauna-building-how-to-build-a-sauna.html#1-buy-a-sauna-kit-to-do-it-yourself
- framing tips: https://www.mycarpentry.com/framing-carpentry.html
- https://web.archive.org/web/20060126211339/http://cankar.org:80/sauna/building/design.html
- tour of 8x8 sauna: https://www.youtube.com/watch?v=56nP5u3FAbI&t=333s
- tudor shed plans: https://www.buildeazy.com/plan_links_sheds.html
- pretty shed: http://www.livingroofsinc.com/wp-content/gallery/s-h-e-l-t-e-r/p4190156-copy.jpg
- stove clearances: https://cdn.shopify.com/s/files/1/1661/5331/files/nippaInstallManual.pdf?3150570655419202463
- cross-section of shed design: http://shedplanspackage.com/wp-content/uploads/2013/11/work-shed-designs-2.jpg
- nice overview of building features: http://bouldersauna.com/
- kit company with useful layouts: http://www.finlandiasauna.com/pdf/Finlandia_Sauna_Brochure-WEB.pdf