Setup Python Development Environment in Visual Studio Code
- Download and install Anaconda
- Download and install Git
- Download, install, and configure Visual Studio Code
- Set up a GitHub.com account
- Try a sample Python project
- Modify the code
- Submit the completed assignment
- Fixing a common error message
This document outlines the steps necessary to set up your personal computer to be suitable for developing Python programs. We will install and set up:
- Anaconda as our Python interpreter
- Visual Studio Code as our Integrated Development Environment (IDE)
- Git for source code version control.
- GitHub for code sharing online.
- Integrate all this software together.
Download and install Anaconda
Anaconda is a Python-based platform for scientific computing that comes with a high quality Python interpreter, a powerful set of readymade code libraries, a high quality IDE, and more.
We will use Anaconda primarily for its Python interpreter.
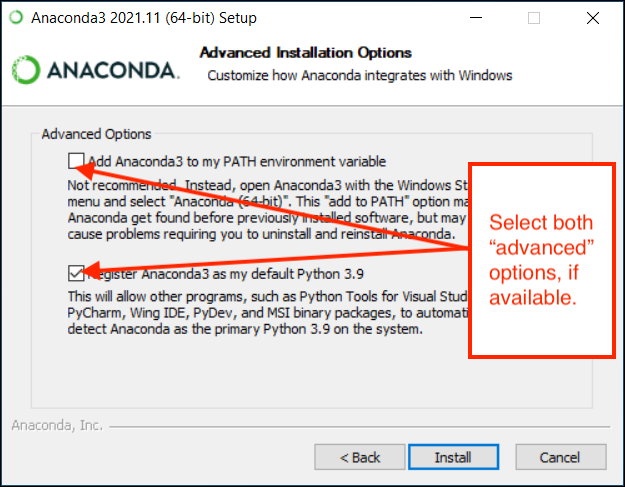
Download and install the latest version of Anaconda for the latest version of Python here. If the installer offers an “advanced” option to add Anaconda to your PATH variable, click yes!
 )
)
Download and install Git
When developing programs, it is often useful to keep backups of old versions of our code, in case we need to refer to them later. Code is often worked in collaboration with teammates, so sharing code easily with others is also a common need. Version control software, such as Git, solves these problems.
Git is open-source version control software, created by some of the same people who make Linux, the open-source operating system.
Download and install Git:
- If using a Mac operating system, download and install
gitfrom here. - If using a Windows operating system, download and install Git For Windows.
Download, install, and configure Visual Studio Code
Visual Studio Code is an Integrated Development Environment (IDE) made by Microsoft - software where we work on code, writing it and trying to solve problems with it (i.e. debugging). It is useful for developing software in many programming languages, including Python.
Download and install
Download and install the latest version of Visual Studio Code here.
Install the Python extension(s)
Visual Studio code is a general purpose IDE. The specific tools that are most helpful for developing in a particular programming language are not included in Visual Studio Code by default. So we will also install some extensions (a.k.a. plug-ins) and change some settings to make Visual Studio Code most suitable for Python development.

Install the Python and related extensions:
- Open Visual Studio Code
- Click the Extensions icon in the left bar (the icon that looks like building blocks).
- Search extensions for the keyword, ‘
python’. One of the top results will be the extension simply named “Python” by Microsoft. Install it! - Search extensions for the keyword, ‘
pylint’. One of the top results will be the extension simply named “Pylint” by Microsoft. Install it!
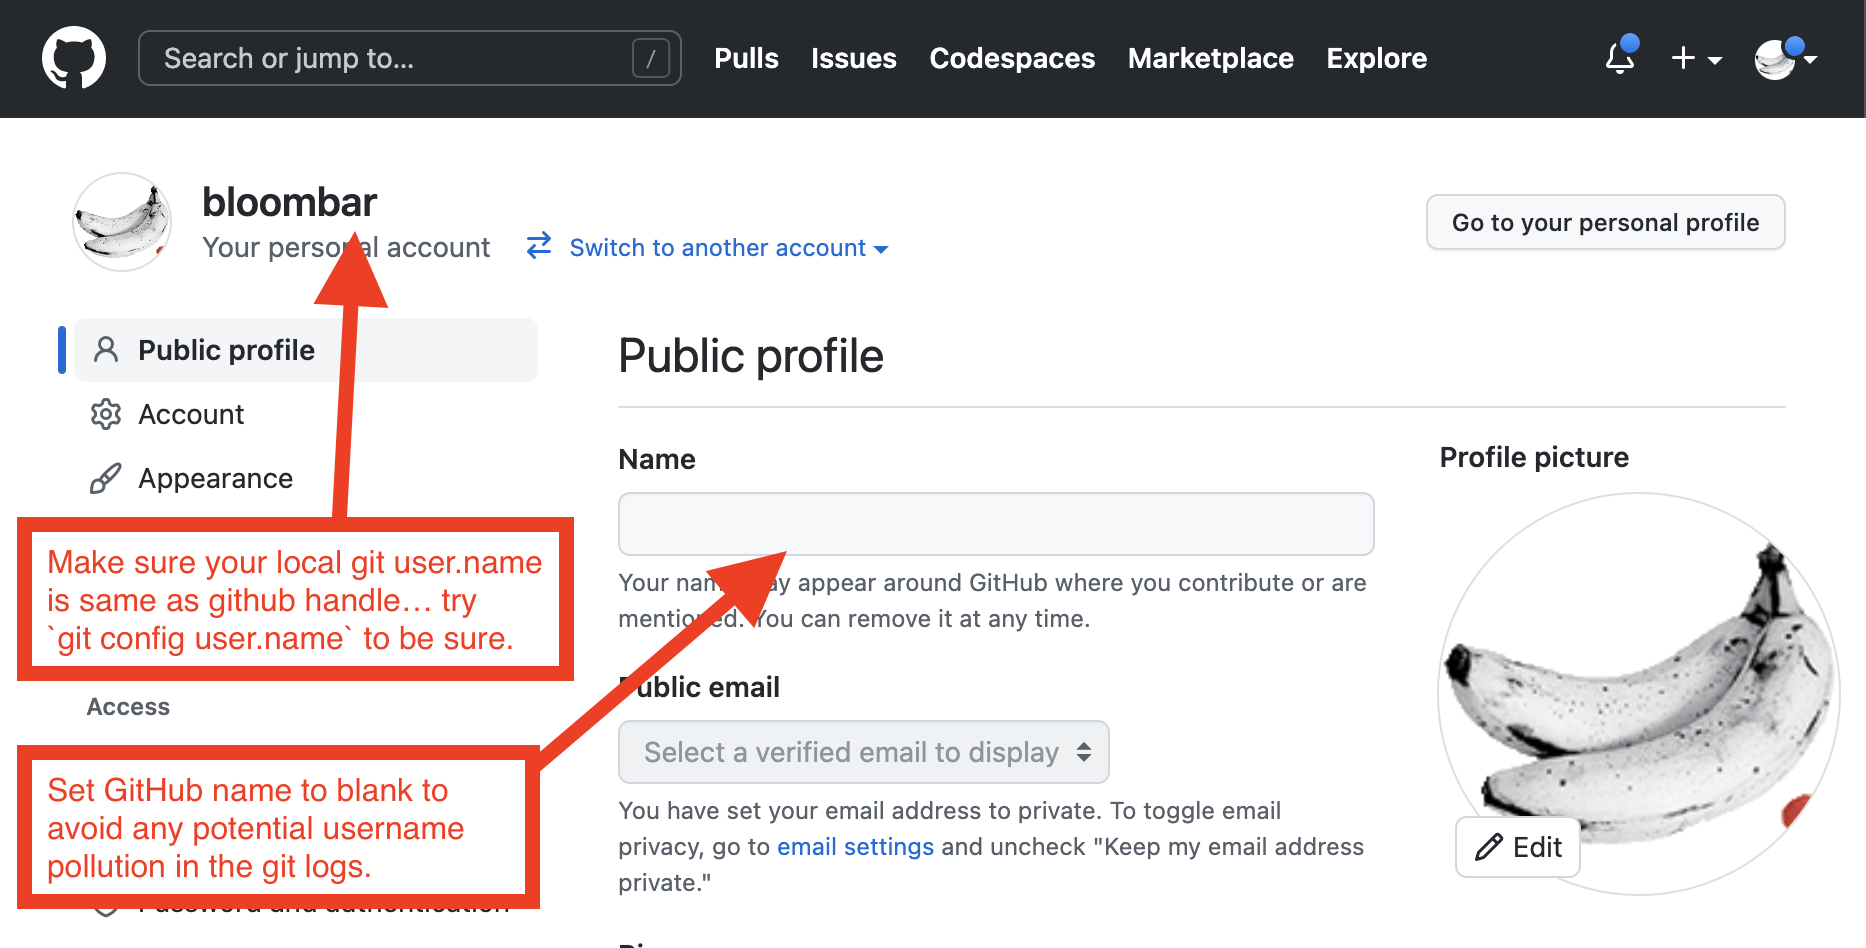
Set up a GitHub.com account
GitHub.com is a web site, operated by Microsoft, where developers can share the code they are using Git to keep backups of… You will need an account on GitHub.com in order to access assignments and share your code with the instructor and graders.
Create an account on GitHub.com and make note of your username and password so you don't lose them!
Try a sample Python project
We’re now ready to kick the tires to see whether the setup works on your computer. You may find the following videos helpful for this part:
- Video: Clone from GitHub to Visual Studio Code
- Video: Set up Visual Studio Code for Python programming
Try the following:
Initialize a sample assignment on GitHub
Create a practice code repository on GitHub from an example assignment we have prepared:
- Open a web browser and go to this example “assignment”
- You will be asked to accept this assignment. Click the button to accept. This will copy code we have prepared and create a repository (an archive of code) for you in your GitHub account.
- Once accepted, you will be shown a link to your personal code repository for this project. Copy this link - you will need it later.

Copy the given sample assignment code to your own computer
We will now download this code from GitHub.com into Visual Studio Code on your own computer…
- Open Visual Studio Code
- click the Source Control icon in the left toolbar and then click the button to "Clone Repository".
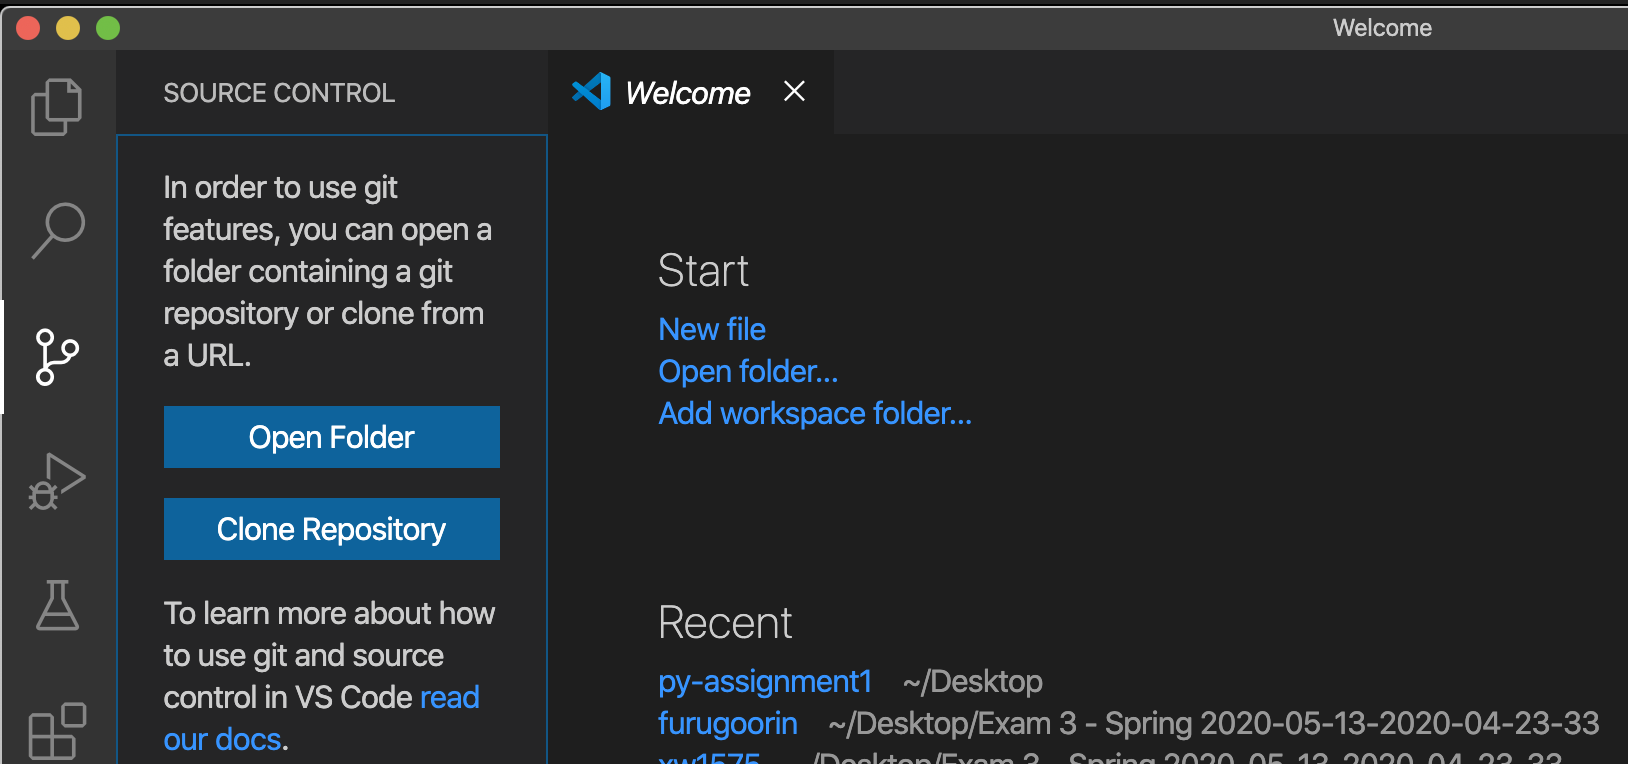
- A text field will pop open at the top of Visual Studio Code for the web address of the repository to clone. Paste in the address of your personal repository on GitHub and hit Enter.
- A Finder (Mac) / File Explorer (Windows) window will pop open asking you where you would like to save the files in this project. Select a folder/directory where you would like to copy this code, such as your Documents directory.
- Visual Studio Code may ask you to “sign in” to GitHub… do so, if requested.

- Once signed in, Visual Studio Code will download a copy (i.e. a clone) of all the files in your GitHub code repository to a sub-directory of the directory on your own computer that you selected.
- Now open this directory up in Visual Studio Code to see the files.
Configure the Python interpreter
Set up the Python interpreter that the example program will use when running in Visual Studio Code.
- Click on the Explorer icon in Visual Studio Code’s left tool bar (the icon that looks like two pieces of paper) - this shows the files in the project.
- Click on the file named
example1.py. - Now click on the Run icon in the tool bar (the icon with a play button with a bug next to it) - this is where you can run the code

- Click the link to “
Create a launch.json file”. A list of configuration options will appear… click “Python file”. - Make sure the Run icon is still selected. You will see a green play button at the top left that will run the program… click it.
- A warning may appear in the bottom-right of the window that you need to select a Python interpreter… If so, click the button to do so. If no warning appears, you can manually select a Python interpreter by going to the Command Palette (using the
View->Command Palettemenu) and typingPython: Select Interpreterinto the text field and clicking the matching menu option that appears.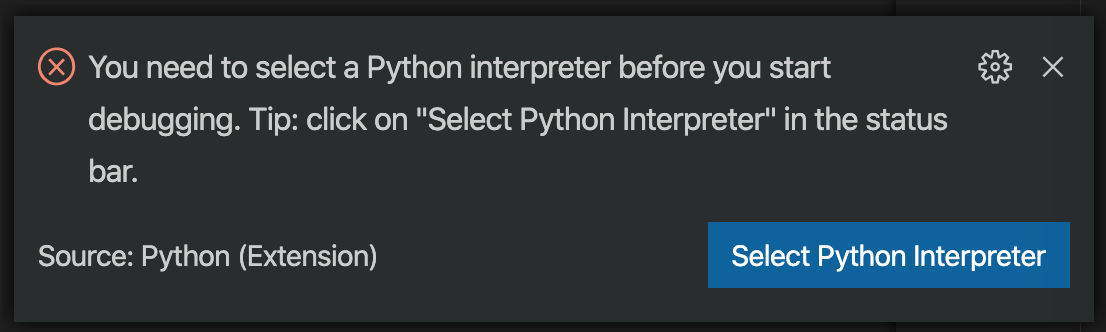
- In the list of Python interpreters, select the version 3.x that has “conda” or “anaconda” in the name - this is the same Anaconda interpreter you installed earlier.
- Click the Run icon at the top-left of the window again. This time it should run… nothing especially interesting will happen, but you should not see an error.
Configure the code linter
A code linter helps identify code that is written incorrectly or in a bad style. Fortunately, the Pylint extension installed earlier automatically points out code that is written contrary to standard coding conventions. No additional work is necessary.
Set up the testing framework
In the sample assignment, we have included code that will tell you whether the code in the project is running correctly. Set up the testing framework in Visual Studio Code:
- Make sure the file named
example1.pyis still open in the editor. Open it in the Explorer view accessed from the Visual Code tool bar, if not. - In the main menus, click the
View->Command Palettemenu option and type, “Python:Configure Tests”. Click this command in the list of matching commands that appears. - In the list of testing options that appears, click “
pytest”. - A list of directory options will appear… click “
tests” - this indicates to Visual Studio code in which directory to find some tests we have prepared to see whether the example code works correctly. - Now click on the Test icon in Visual Studio Code's left tool bar.
- After a few seconds, a green play button will appear towards the top-left of the window. Click it to run the tests.
- If the tests pass, you will not notice anything happen… no error and no change is good! Everything works!
- Sadly, the tests will fail because you have not completed the assignment yet!
- A small little icon in the Visual Studio Code status bar at the bottom of the window will show an “
X” or a triangular warning icon indicating that some tests failed. If they all pass, it will show only a checkmark icon indicating that all tests passed.
Modify the code
You have now completed the setup and are ready to modify the code, as you will in every assignment.
Add a few lines of code
You will now add a few line of Python code to the sample program.
- In Visual Studio Code's Explorer view, open the file named
example1.py. - At the very end of the file, write the following new lines of code… try writing them yourself, not copy-and-pasting.
- Save the file.
def main():
    print( foo("Hello", "world!") )
    print( bar() )
    baz()

main()
Verify that the tests pass
We will verify that the test programs we have written now all pass. Failed tests help identify problems in the code.
- Switch to the Test view in Visual Studio Code
- Click the “
Run All Tests” button - the green play button that appears if you hover the cursor over the top-left area of the window. - The test results will appear in the bottom status bar of Visual Studio Code - a check mark next to a number, if all tests pass; or possibly an “
X” icon if some or all tests fail. - If the tests fail, it is likely that something is wrong in the code you modified - verify the code is correct and try again.
Run the program
We will now try to run the program - this time, we should see some output produced by our changes.
- Switch to the Run view in Visual Studio Code.
- Click the Run icon (the green play button towards the top-left of the window).
Verify the output is correct
Running the program should have produced 3 lines of output in the Terminal panel at the bottom of the Visual Studio Code window.
- Confirm the following three lines of text appear in the Terminal window:
Hello world!
Hello world!
Hello world!

Submit the completed assignment
You are now ready to submit this sample assignment. You can do sodirectly from Visual Studio Code with the following steps, in the indicated order:
- Switch to the Source Control view in Visual Studio Code - this view will show you a list of the files you have modified.
- In the “
Message” text field towards the top-left, enter a unique message to yourself about what you have changed and, while still with the text field selected, type Command-Enter on Mac OS X, or Control-Enter on Windows, to “commit” the changes you’ve made with this custom message. If you forget to hitCommand-Enterafter typing the message, you can instead click the “``…`” button above the message field and click the "Commit all" option in the menu that appears. or Control-Enter (Windows)")
- Now, click the ‘
...’ button above the message field and click the ‘Push’ option in the menu that appears - this will upload your changes to your personal code repository on GitHub.

You have now submitted your completed assignment. Your changes are now posted to GitHub.com, where the instructor and graders can access it. You can verify that yourself manually by visiting your repository on GitHub.com and making sure the code displayed there is what you submitted.
Fixing a common error message
If Visual Studio Code pops open a message like “Make sure you configure your 'user.name' ...”, solve this by doing the following…
- in Visual Studio Code, select the
View->Terminalmenu option. - In the Terminal at the bottom of the window, type in the following commands, one line at a time, and hit Enter after each line:
git config --global user.email "mona.lisa@louvre.org"
git config --global user.name "monalisa"
Replace mona.lisa@louvre.org and monalisa with the same email and login name you used to register an account on GitHub.
… and make sure that your GitHub username and email match.